
 Some of us like Halloween, and then some of us are an everyday Norman Bates – anticipating, waiting, lurking in corners, no Hocus Pocus makes Jack a dull boy, clown in a sewer, Halloween devotee.
It really started when I was a kid, raised in the 90’s, right here in Rochester. There was always something magical about that night. The ability to be anything you wanted, staying up late(r), trading your stash from your pillow sack for upgrades, and watching scary flicks on TVs that they don’t make anymore. Everything, even now, feels vintage and lovely, and traveling back to these times makes me feel warm and nostalgic. I find myself getting hyped up about Halloween and all the details, hoping my child shares a similar experience and love for the spooky festivity.
I was fortunate to have a really creative mother. She would stitch and sew our costumes, which were inevitably covered up by boots and jackets. I vividly remember costume marches at school, showing off our interests through dress-up. One year my mom dressed me up as an angel. A tulle skirt and a bun is something to get very excited over. Barely five, I couldn’t figure out how to have a successful potty break wearing a leotard and layers of tulle. Long (messy) story short, I missed the costume parade.
We all have that one year when you outgrow your parental costume ideas. I was five. My mom made the cutest lion mane that I, at the time, wanted zero part of. None. Disapproving face captured below. The following year I chose my own costume, opting for a bridal ensemble, a princess crown, and pretty much ate a tube of lipstick.
Now, as a mother who is continuing the DIY tradition, I have come to appreciate my mom’s ability to come up with a one-of-a-kind costume on a budget. Here is a list of simple, DIY costume projects that are not only frighteningly adorable, but also under $20.00!

![]()
Lion
Materials:
- Elastic
- Gold/Yellow Yarn
- Scissors
- Needle and thread
Steps:
- Put in the movie Hocus Pocus, or another fall favorite. The timing for this project is one full movie long.
- Measure out a piece of elastic. If you have a willing child, gently loop the elastic under the front end of the chin, and up to the top of the head. Cut elastic to desired length – keep in mind, you can easily shorten the elastic – too loose will cause the mane to slip off. You should be able to easily slip 2-3 fingers between the chin and the elastic.
- Cut many, many, many 6 to 8-inch yarn pieces. Bundle sets of three and secure to elastic by doing a basic knot. Continue adding yarn until the elastic band is hidden. Tip: Plush and soft yarn is recommended since it will be touching the child’s skin directly.
- Once the elastic band is covered with yarn knots, stitch the two ends together using needle and thread.
- Complete costume with a cozy gold, orange or brown sweatshirt. For added sweetness, use an eyeliner pencil to add facial details.
Budget: $15.00
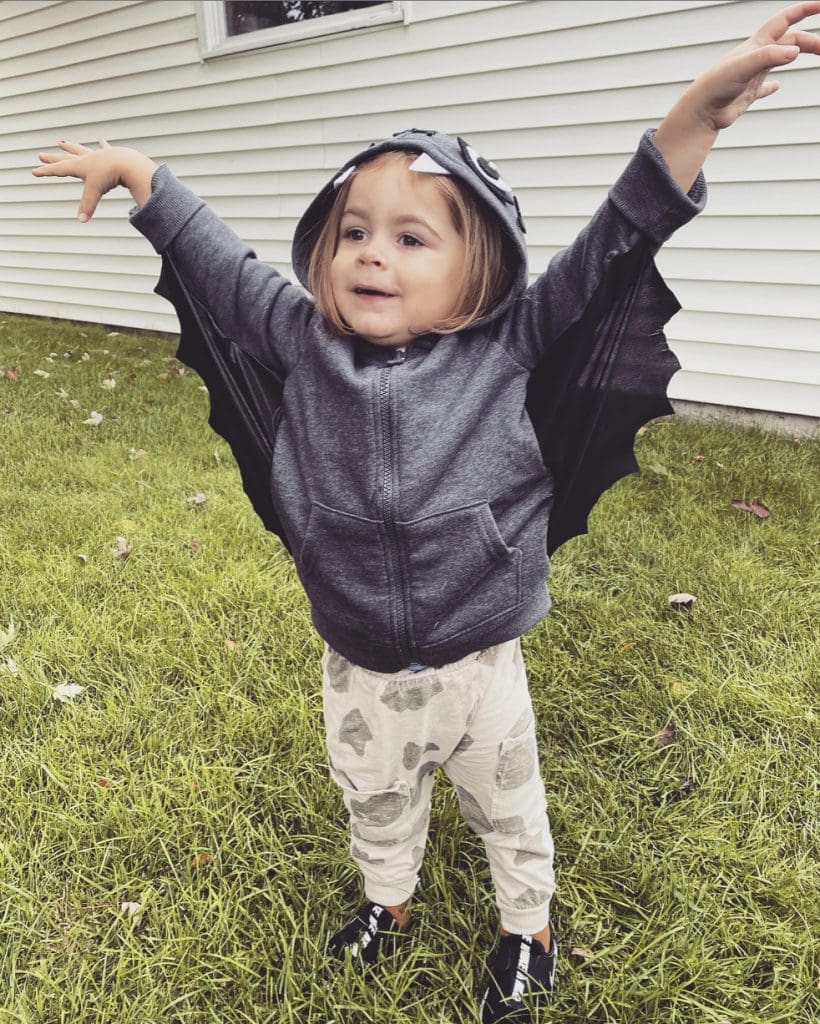
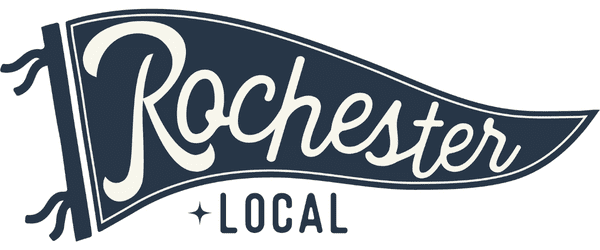
Bat
Materials:
- Gray hoodie
- ½ yard fluid black fabric
- Felt
- Scissors
- Hot glue/gun
Steps:
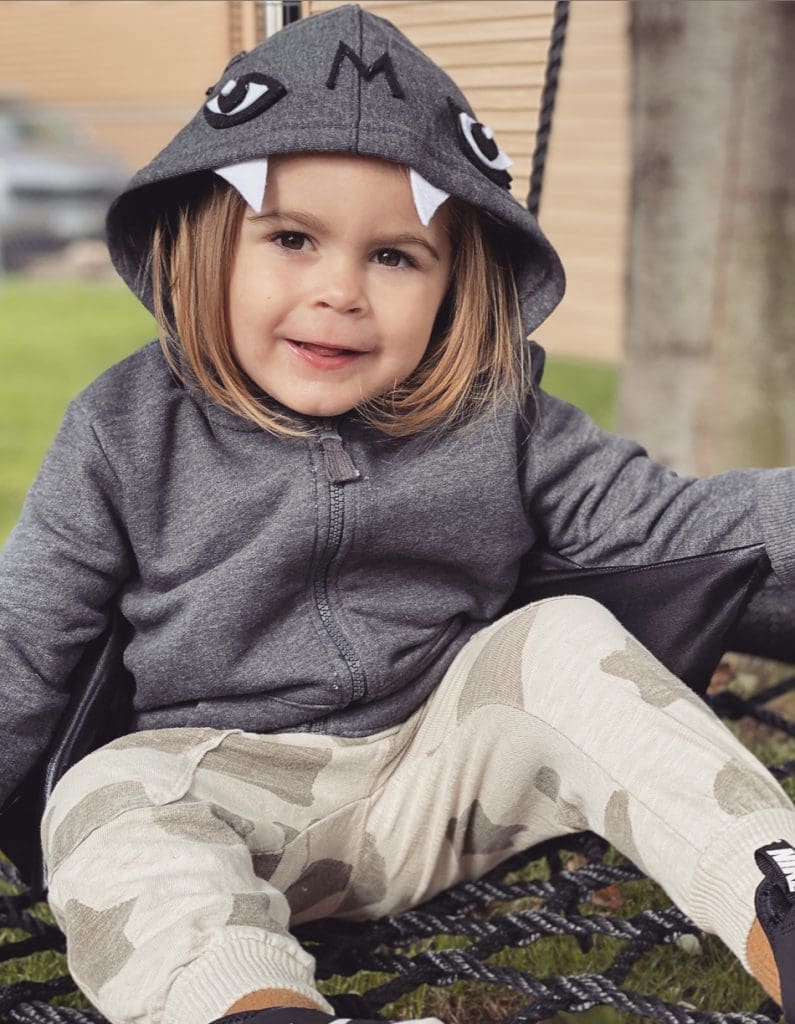
- Make two wings by cutting “rainbows” out of the fabric (see diagram).
- Run hot glue along under arm seam. Press fabric wings into glue. Cut off excess.
- Cut a bat nose, eyes, fangs and ears out of felt and glue to hooded portion of the sweatshirt.
- Accessorize with comfy pants and warm socks.
Budget: $15.00
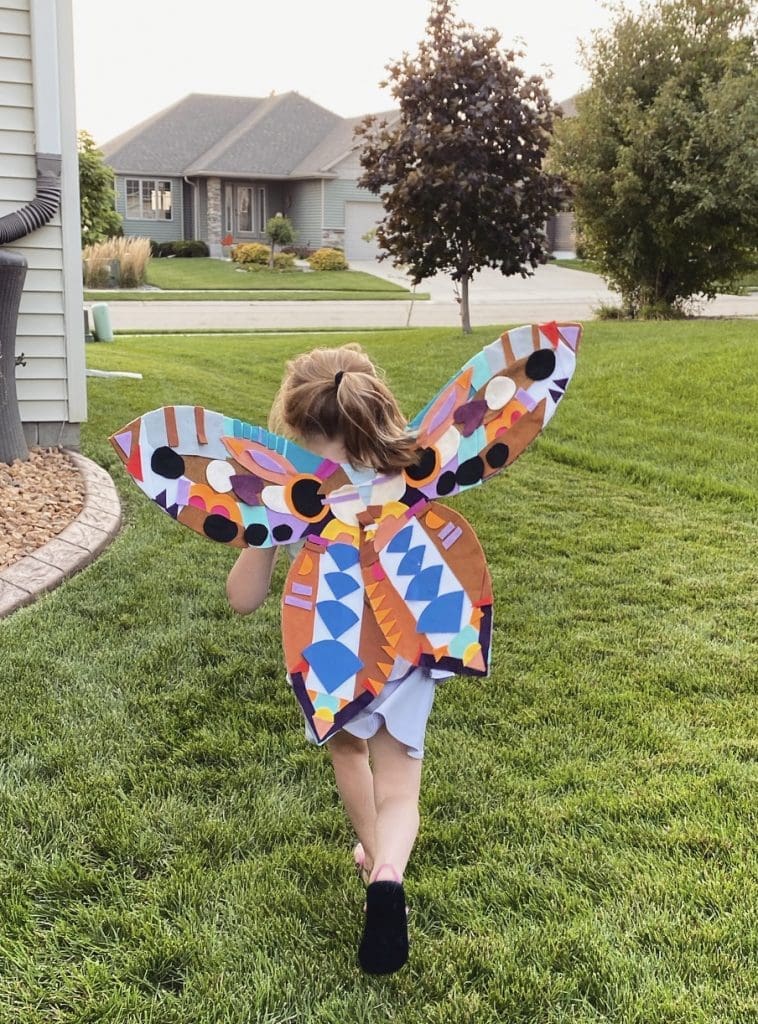
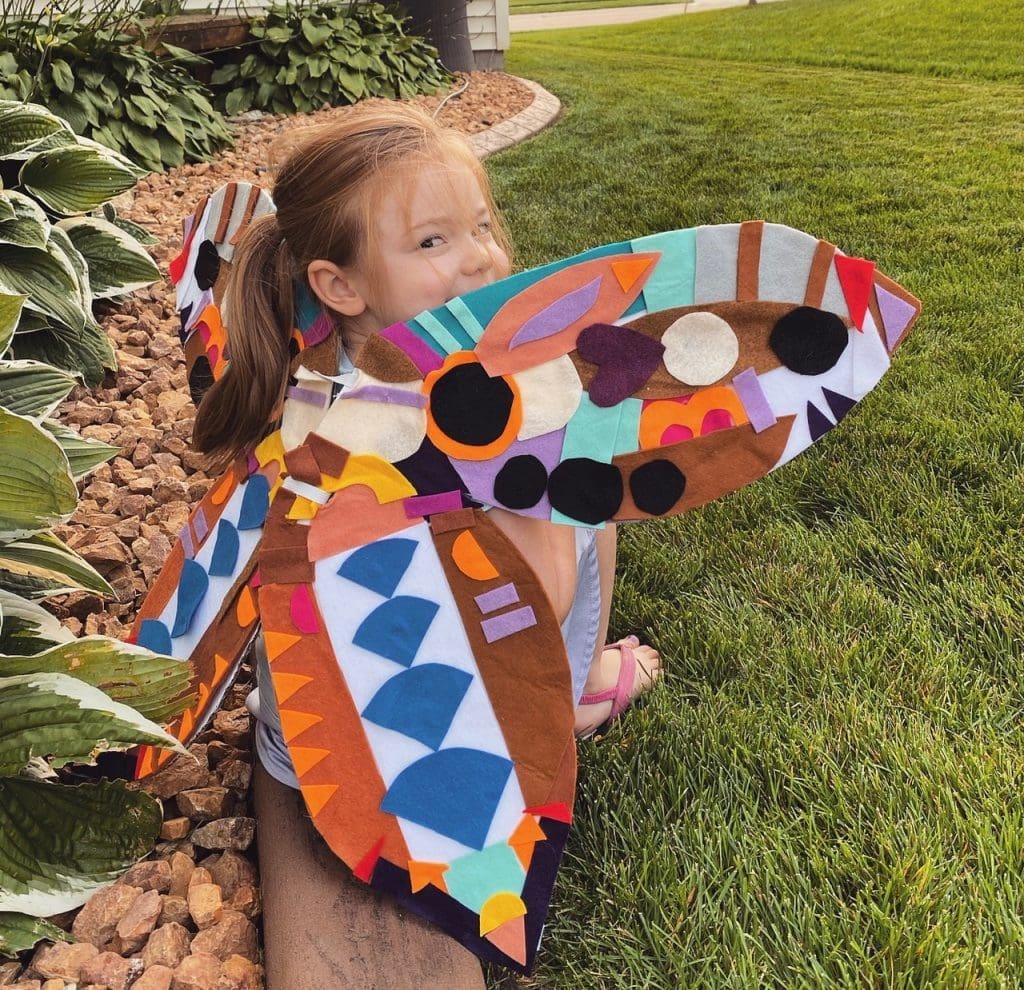
Wings
Materials:
- Cardboard box (up-cycle)
- Box cutter
- Felt or card stock
- Elastic
- Hot glue/gun
- Scissors
- Needle and thread
*Bonus: This is a great activity to get your littles involved with – they can learn about colors and shapes!
Steps:
- Grab a box or poster board and cut a pair of wings. Punch or cut a few holes in the cardboard cut-out throughout so wind will pass through. Punch or cut four holes on either side of the cardboard, where the wings meet, and thread elastic through (see diagram). Stitch the two ends together to secure.

- Now for the fun part, cut and glue felt (or card stock) shapes on top of the wings. Get creative! You can even check out different butterfly, dragonfly, or moth wing patterns for inspiration. Hot glue is recommended for this project, so make sure an adult is present.
- Complete costume with bright colored clothing. *Bonus: The wings can go over jackets!
Budget: $5.00

Paper Dolls
Materials:
- Cardboard box (up-cycle)
- Box cutter
- Acrylic Paint
- Ribbon
*Bonus: Use buttons and gems for embellishments.
Steps:
- Sketch out a paper doll outfit silhouette. Use box cutter to cut out pattern. Save the tabs! Like every convincing paper doll outfit, you can’t forget the tabs!
- Paint outfit using your favorite colors. When it comes to fashion, there are no limits. Let dry. Punch two holes on the base of the tabs and thread ribbon or yarn through. Secure with knots. To be worn around neck similar to a necklace.
- Complete with mom’s big purse as a candy bag.
Budget: $5.00
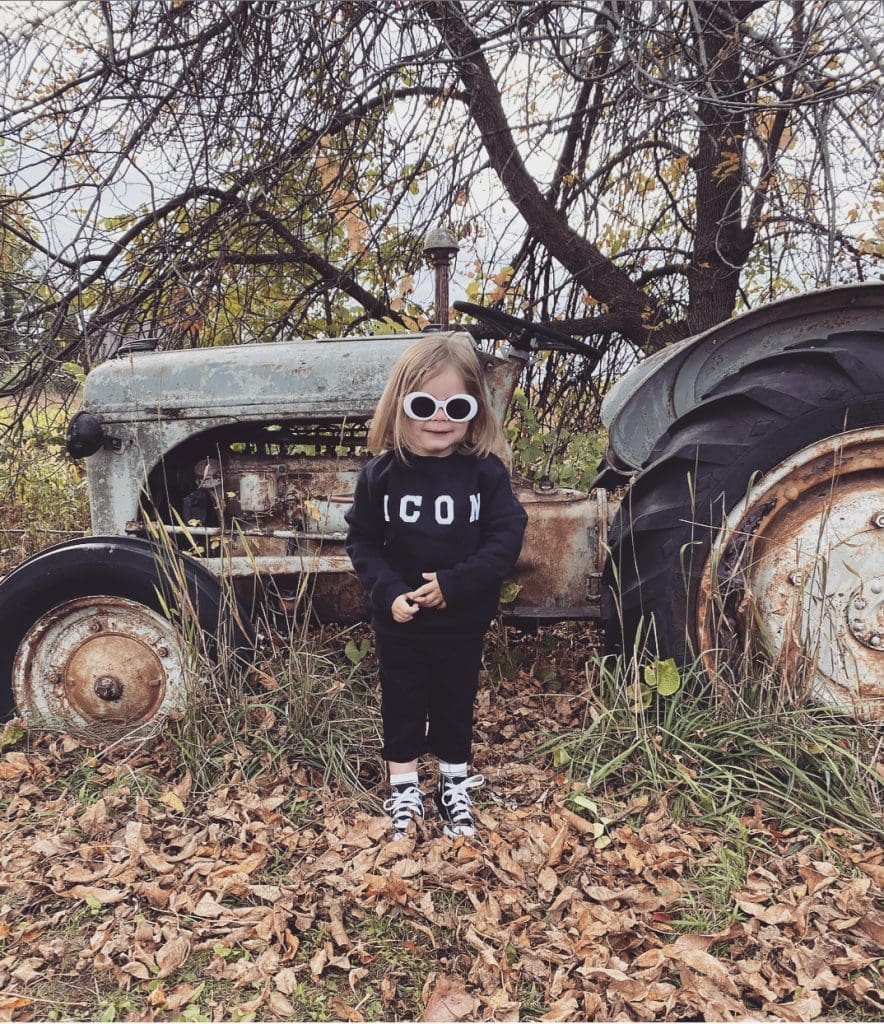
Icon (David Rose)
Materials:
- Iron on Letterman letters
- Black crew neck sweatshirt
- Sunglasses
- Black boots/shoes
- Striped tube socks
- Black pants
- Scissors
- Iron/Ironing Board
Steps:
- Place lettering on sweatshirt and follow iron-on instructions.
- Thrift or re-purpose some black pants on their last leg. Cut pant legs so that the bottom hits mid-shin. Roll bottoms slightly.
- Always, always accessorize.
- Just Remember: When it comes to actors on the big screen, you can recreate their iconic threads with a few basic items around your house!
Budget: $20.00
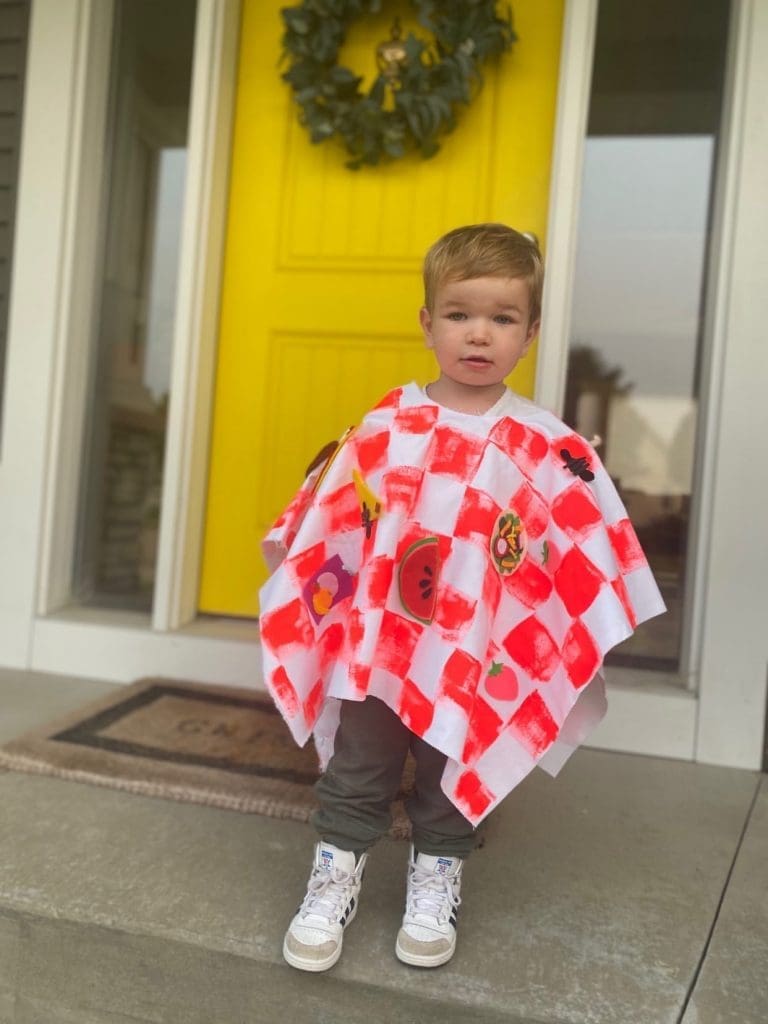
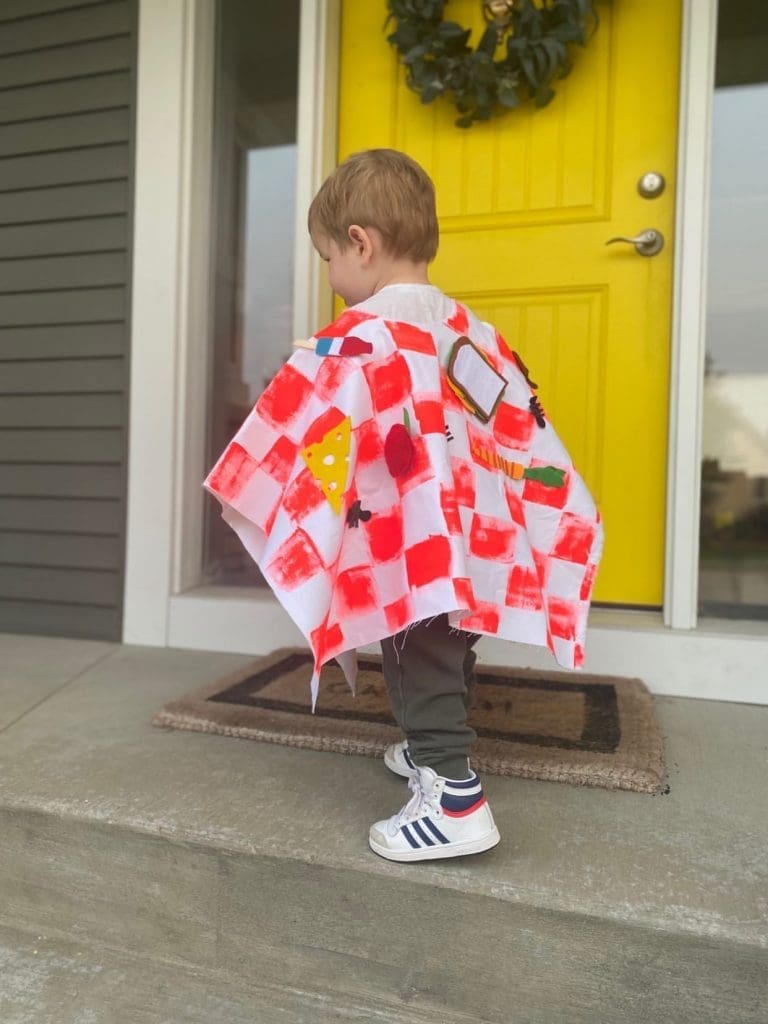
Picnic Blanket
Materials:
- 1 1/2 yards of canvas fabric
- Acrylic paint
- Felt
- Scissors
- Hot glue/gun
Steps:
- Cut canvas into a square. Find center and cut hole for head. Be mindful of size, and test the child’s head if needed. Recommendation: Cut a smaller hole for the neck with a slit for easy on and off.
- Lay canvas out flat. Paint squares. You can do this organically, or measure. Let dry.
- Begin cutting your favorite picnic items out of felt. For a quick corner cut, safety pin empty and clean packages of your favorite picnic food to the costume. Maybe even include a few full packages of snacks to tide you over later. If using felt, hot glue items onto picnic blanket.
- For added adorableness, create a hat using a paper plate! *Bonus: Costume can easily go over a jacket!
Budget: $10.00
Halloween is a time to allow our children to explore the farthest corners of their imagination. Whatever they want to be for Halloween, embrace it! Wishing you all a safe and spooky night!