


*Originally published April 2020*
This time of Safer At Home and social distancing has led to all sorts of new experiences. Home haircuts for our 3 boys? Yep. One turned out good, one turned out weird, and the third one I cried through, even though it ended up looking ok. Homeschooling? A weary, half-hearted yes. Zoom/Skype/Google Meet meetings for work/school/social time? The new norm. Making (and cleaning up) 782 meals in 4 weeks? Sigh. Yes. Growing veggies in our kitchen windows? Yes! And oddly, the least traumatic/stressful of all of the above listed experiences.
It all started with late-winter doldrums coupled with COVID-19 stress. I needed SOMETHING positive that didn’t involve stress-baking with multiple sticks of butter. Also, we moved into a new house this winter, and the driveway and sod won’t be in until May, meaning all the spring snow melt and rain + 3 boys = mud like you wouldn’t believe. The mud is everywhere. EV-ER-Y-WHERE. Add in park closures and staying home 24/7 with our pack of monsters needing lots of outside time, and it’s a little crushing. Sorry…I got sidetracked there. That was a long way of explaining: “In lieu of being able to watch green things grow outside in our yard/mud-pit, my soul needed something green to grow inside that didn’t make a huge mess and simultaneously felt productive.”
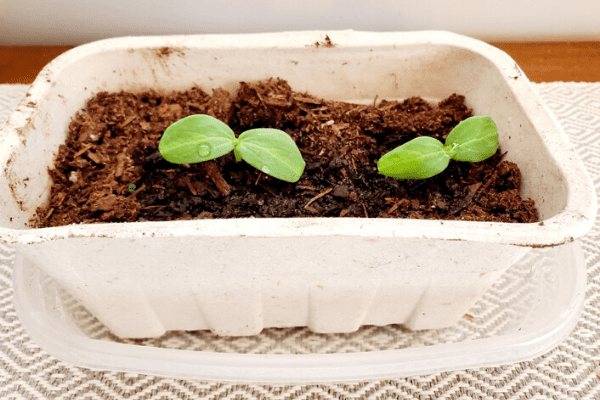
For prep, I started saving all of our recyclables that would work as little planters: egg crates, sour cream containers, yogurt cups, strawberry clamshells (and the lids for each–perfect to use as drip trays) and punched little holes in the bottoms of the containers for drainage. Seal up any holes in the lids (plastic wrap, duct tape, whatever you have on hand that will keep leaks off your windowsill), and you have created your own planters with tray to catch water drips. Then we filled the containers with potting soil and got planting. Some of the veggies we started from seed packs (need seeds? Rochester Public Library is mailing them out for free!), and some we started from kitchen scraps.

From seed packets, we planted green beans (bush variety), bell peppers, cucumbers, and cilantro. The beans sprouted almost immediately, making the return very fun for the kids–not having to wait long to see something grow. The bell peppers have a longer germination period, and haven’t sprouted yet, but can take up to 3 weeks. Cucumbers popped up in less than 2 weeks, and I just planted cilantro 3 days ago, so it’s not up quite yet.
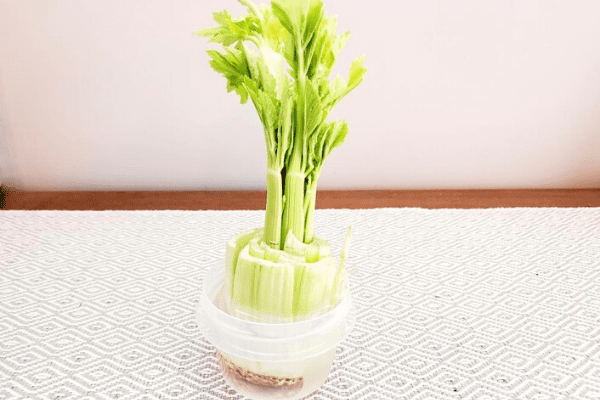
We then ventured into other veggies, grown from scraps. A little internet research (seriously, what would we do without the internet right now?!?) gave me this helpful tutorial on how to grow veggies and herbs from your own kitchen scraps. There are many options depending on your family’s tastes and what you’ll use in the kitchen. To keep it simple, I started with celery, onion, and tomatoes.
Celery: Cut off the base of your celery bunch, leaving at least 1- 1.5″ at the bottom. Place either in a cup of water, or in dirt (partially covered), set in a sunny window, and watch the celery grow back! We are trying both methods to see which grows better. So far, they seem to be about equal. I also am experimenting with cutting off the bigger stalks and leaving the little under-grown ones in the center still attached, to see if they will turn green and grow full-size. After just a few days, they are looking good!

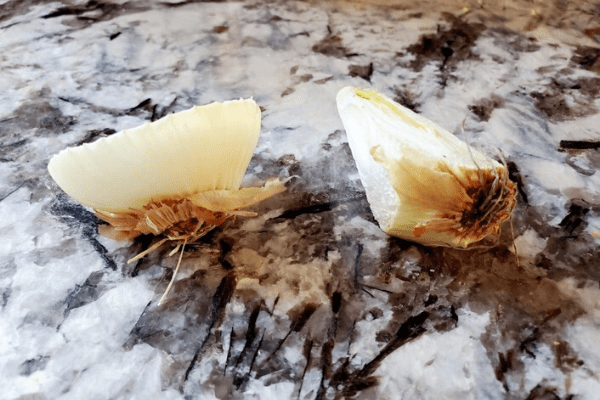
Onions: Cut the root base off the onion, leaving about 1/4″ of onion attached. Set out to dry for a few hours to a few days. It won’t hurt it. I put mine in a bowl out in the garage so the house didn’t smell like raw onion while it was drying out. After, put in a deeper container with good drainage, and completely cover with potting soil. Put in a sunny window and watch it grow!

Tomatoes: I squeezed the seeds out of a couple of cherry tomatoes that were past their prime, and pushed them down into the dirt of a couple of clean yogurt cup containers. They sprouted in a little over a week. Some sources say that tomatoes bought at the grocery store may not produce tomatoes, so this little experiment may be for naught. But in the meantime, it’s fun to watch the plants grow.

All of our veggies are currently growing in west-facing windows, as they are the ones furthest out of reach for Captain Destructo–otherwise known as our 2 year old–but a south-facing window would be ideal. Watch the soil carefully for drying out, as shallow containers like egg crates will dry out quickly, for sure needing water every day. Not that we’re going anywhere…so at least our little quarantine spouts will be well-cared for. Most of these plants I plan to transplant into our future vegetable garden, which keeps getting bigger and bigger the longer we are in quarantine.
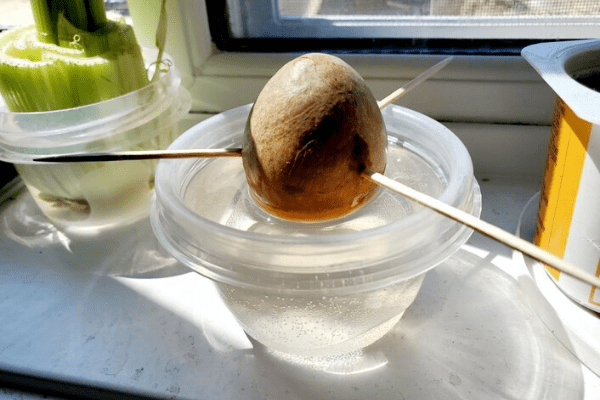
The kids have enjoyed helping and watching our little seedlings grow. We’re learning together about gardening, taking care of our plants, and reducing food waste. While not an immediate return, we are looking forward to eating our own veggies! In the meantime, we keep adding to our little windowsill garden. “Mom, can you grow an avocado plant from a pit?” Yes we can! It will take 10-15 years, but we’ll love watching our little quarantine keepsake tree grow.
*Originally posted April 2020*